Here’s a comprehensive step‑by‑step guide to creating your very own Telegram bot—from registering it with BotFather to sending your first automated message.
Introduction
Telegram bots are automated accounts that can perform a wide range of tasks—from simple replies to complex workflows—via Telegram’s Bot API. They’re perfect for customer support, notifications, surveys, games, and more. In this guide, you’ll learn:
- What you need before you begin
- How to register your bot with BotFather
- How to retrieve your bot’s token
- How to write a simple “Hello, World!” script
- How to deploy and test your bot
Let’s get started!
Prerequisites
Before you begin, make sure you have:
- A Telegram account (mobile or desktop).
- Basic programming knowledge (examples use Python).
- Python 3.7+ installed on your computer.
- An IDE or text editor (e.g., VS Code, PyCharm).
- A stable internet connection.
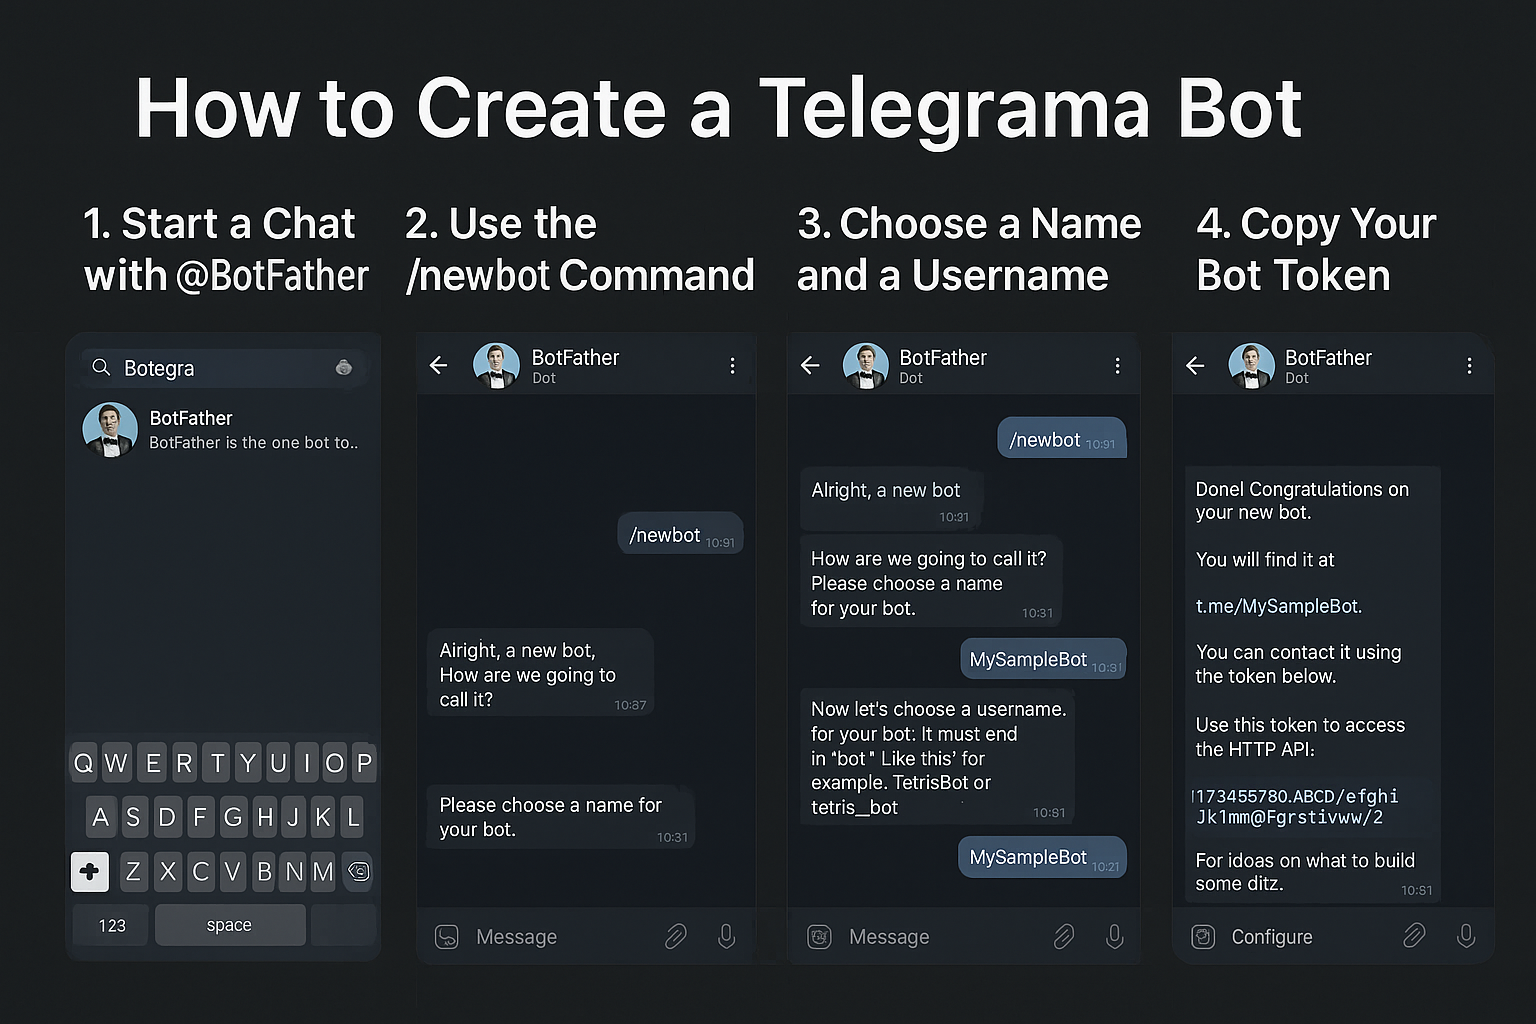
Step 1: Talk to BotFather
- Open Telegram (mobile, desktop, or web).
- In the search bar, type @BotFather and select the verified account.
- Click Start (or send
/start).
BotFather is the official Telegram bot for creating and managing bots. All bot registrations must go through it.
Step 2: Create a New Bot
- In the chat with BotFather, send the command:
/newbot - BotFather will ask:
“Alright, a new bot. How are we going to call it?”
Send your bot’s name (this can have spaces and will appear in contacts). - Next, BotFather asks for a username. This must:
- End in
bot(e.g.,WeatherWizardBot). - Be unique across Telegram.
- End in
- If the username is accepted, BotFather replies with:
- A link to your bot:
t.me/YourBotUsername - Your bot’s HTTP API token (a long string).
- A link to your bot:
Save this token! You’ll use it to authenticate API requests.
Step 3: Set Up Your Development Environment
- Create a project folder, e.g.,
telegram_bot_demo. - Open a terminal inside that folder.
- (Optionally) create a virtual environment:
python3 -m venv venv source venv/bin/activate # macOS/Linux venv\Scripts\activate # Windows - Install the
python-telegram-botlibrary:pip install python-telegram-bot
Step 4: Write Your First Bot Script
Create a file named bot.py and paste in the following code, replacing YOUR_BOT_TOKEN with the token you got from BotFather:
from telegram import Update
from telegram.ext import Updater, CommandHandler, CallbackContext

def start(update: Update, context: CallbackContext):
    """Sends a welcome message when /start is issued."""
    user_first_name = update.effective_user.first_name
    update.message.reply_text(f"Hello, {user_first_name}! 🤖 Welcome to your new bot.")

def main():
    # Initialize the bot and dispatcher
    updater = Updater("YOUR_BOT_TOKEN", use_context=True)
    dp = updater.dispatcher

    # Register the /start command handler
    dp.add_handler(CommandHandler("start", start))

    # Start polling for updates from Telegram
    updater.start_polling()
    print("Bot is running... Press Ctrl+C to stop.")
    updater.idle()

if __name__ == "__main__":
    main()
Updaterconnects to Telegram and receives updates.CommandHandlerlistens for/startand invokes thestart()function.
Step 5: Run and Test Your Bot
- Run the script:
python bot.py - Open Telegram, navigate to your bot’s chat (t.me link), and send:
/start - Your bot should reply with a friendly greeting.
Next Steps & Tips
- Add more handlers: Try
MessageHandlerfor text,CallbackQueryHandlerfor inline buttons, orJobQueuefor scheduled tasks. - Use webhooks: For production, switch from polling to webhooks hosted on a server for better scalability.
- Secure your token: Never share it publicly; use environment variables or a secrets manager.
- Explore the API: The official docs expose hundreds of methods for sending media, keyboards, location, and more.
- Deploy: Host your bot on a cloud service (Heroku, AWS, GCP) to keep it running 24/7.
Congratulations! You’ve just created and deployed your first Telegram bot. From here, the sky’s the limit—build chatbots, notification systems, games, or integrate with other APIs. If you run into any questions or need feature ideas, feel free to ask!